Resources
Books
Videos
Ajith
“We live in a society absolutely dependent on science and technology and yet have cleverly arranged things so that almost no one understands science and technology. That’s a clear prescription for disaster.”
Carl Sagan
Even though our lives are surrounded by technology there is nothing much of it in our school education, especially on the experimental side. There are many areas of technical skill like computer programming, project management, digital marketing, technical writing etc. Here we are proposing a method that will cover the following skills in an integrated manner, using limited hardware resources.
Basic electrical and electronic compoents, circuits and measurements. Using conventional methods, the hardware required are test equipment like multi-meter, oscilloscope, frequency counter etc. and components like resistors, capacitors, diodes, LEDs, transistors, etc.
Computer programming. This can be taught by selecting any of the High Level languages like C, Java, Python etc. or by using a visual programming interface like the MIT Scratch, where one assembles the code using blocks representing various commands. Hardware requirement is a computer.
Micro-controller basics. Understanding this topic requires some knowledge about the binary number system, block level understanding about the Central Processing Unit (like registers, ALU etc.) and some familiarity with a programming language like C. Hardware required is a computer along with some micro-controller training board, like Arduino.
Programming using high level languages like C, Python etc. involves preparing a set of commands that can be carried out using a computer. To write such programs you need to learn the commands (or keywords) and howto put them together. A Visual Programming Language (VPL) allows you to build programs using graphical components and figures. Conventional textual programming is replaced in VPL with a set of visual components that are arranged in a systematic way. The input, actions, connections etc. are represented by blocks that can be dragged and dropped into the code. Using this method one can learn the technique of developing computer programs before proceeding to more serious coding using any of the programming languages like C, Java, Python, etc.
An alternate approach to cover all these topics, using an Android phone, is explained below. It uses a software capable of providing a programming environment similar to MIT Scratch, that can also communicate with some extra hardware connected to the USB port of the phone. Electrical measurements and micro-controller programming can be done that way. The hardware requirements are an Android phone to learn coding, ExpEYES for learning electrical & Electronic circuits, and KuttyPy for micro-controller coding.
Connecting ExpEYES-17 (the latest update is called SEELab-3) to an Android phone converts it into a collection of test equiment like oscilloscope, power supply, etc. Measurements can be performed using a GUI or by assembling Code using Blocks.
KuttyPy is an AtMega32 micro-controller board with a USB interface. By attaching it to the phone, via the USB port, one can control all the resources of the micro-controller.Such a setup will help the students to perform various kinds of measurements and also gives them some idea about the working of a micro-controller. It is also possible to write C code and upload it to the micro-controller.
Both ExpEYES and KuttyPy implements Block Based Coding using Google’s Blockly library. You can download these Apps from Google Play Store.
Install ExpEYES-17 (SEELab-3) from Google Play Store
Install KuttyPy from Google Play Store
Either of this can be used for learning Block based Coding, without any hardware connected to the phone. ExpEYES hardware is required to convert the phone in to a test equipment suite having voltmeter, oscilloscope, DC power supply etc. KuttyPy hardware is required to practice programming micro-controllers.
Main screen of the KuttyPy App
Screen after selecting ‘Code Blocks’ -> ‘Basics’ -> ‘Create New’
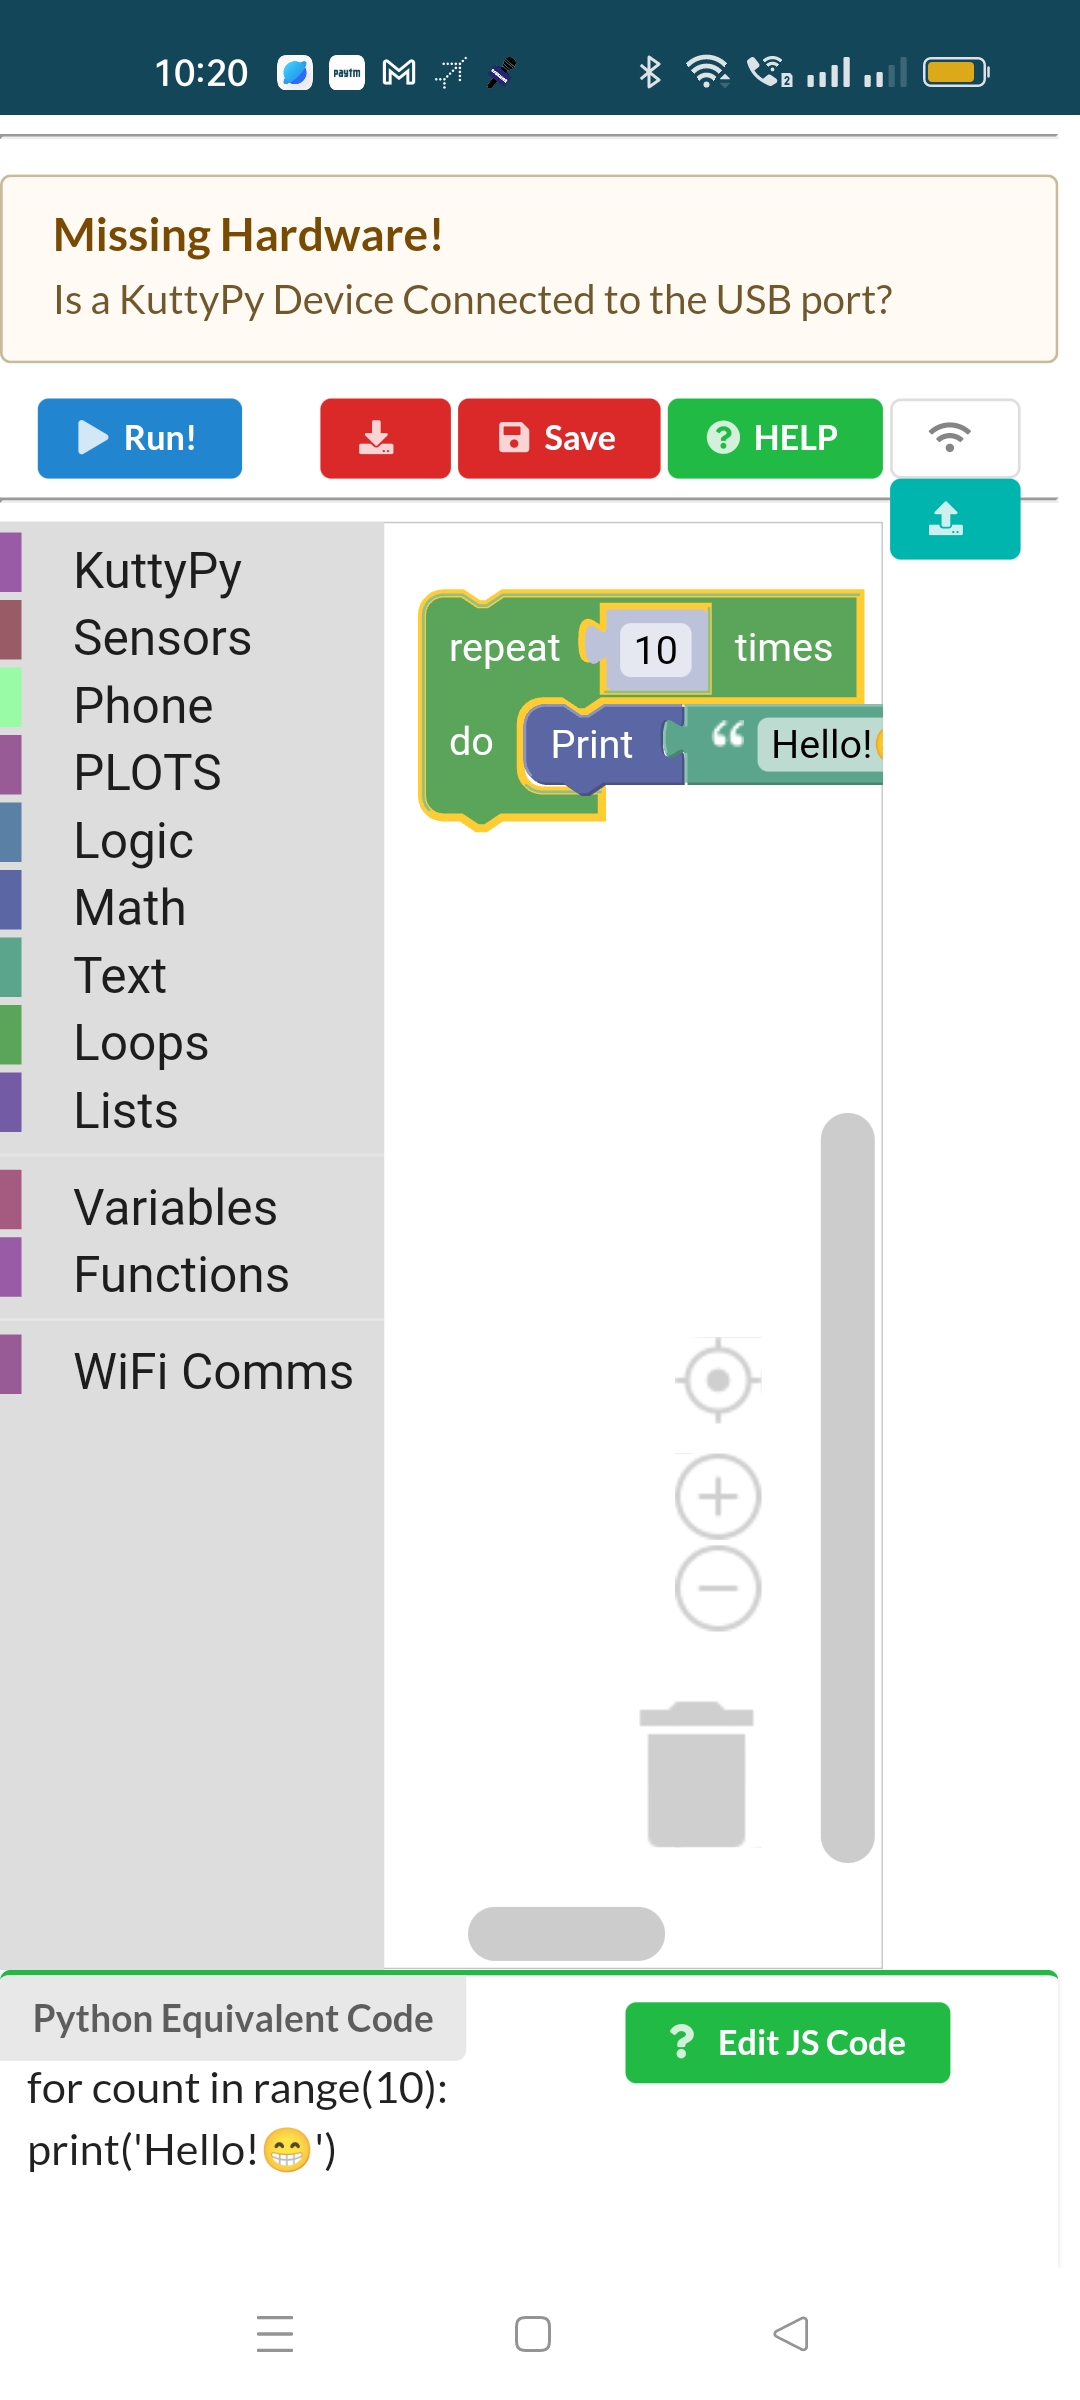
Result after clicking on the “Run” button
The “Print Hello” block is added by default. You can remove it by dragging the block to the dust bin. You can select from the group of commands listed on the let side. Let us modify this code by putting the print statement inside a Loop. From the ‘loops’ section select the Repeat 10 times block and move the Print statment to it.
You must have noticed the “Missing Hardware” Warning on top of the screen. The software expects a Micro-controller connected to the USB port of the phone. But what is a micro-controller ?
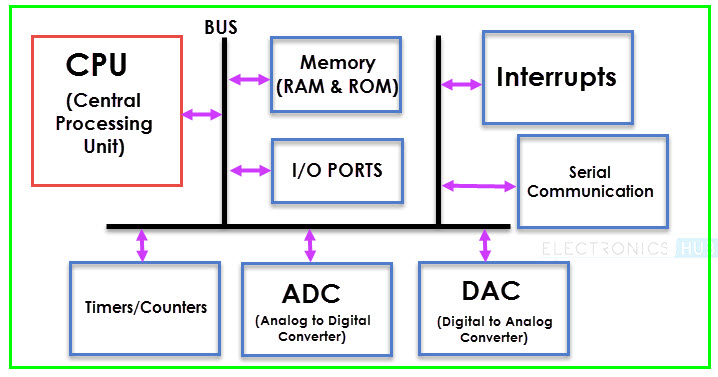
A micro-controller is a Central Processing Unit (CPU) combined with RAM, ROM, Input/Output ports etc. The easiest way to gain familiarity with a micro-controller is to learn about the registers (special memory locations) that controls the input/output ports. We can connect LEDs and Switches to the I/O ports and control/monitor the voltage levels on them.
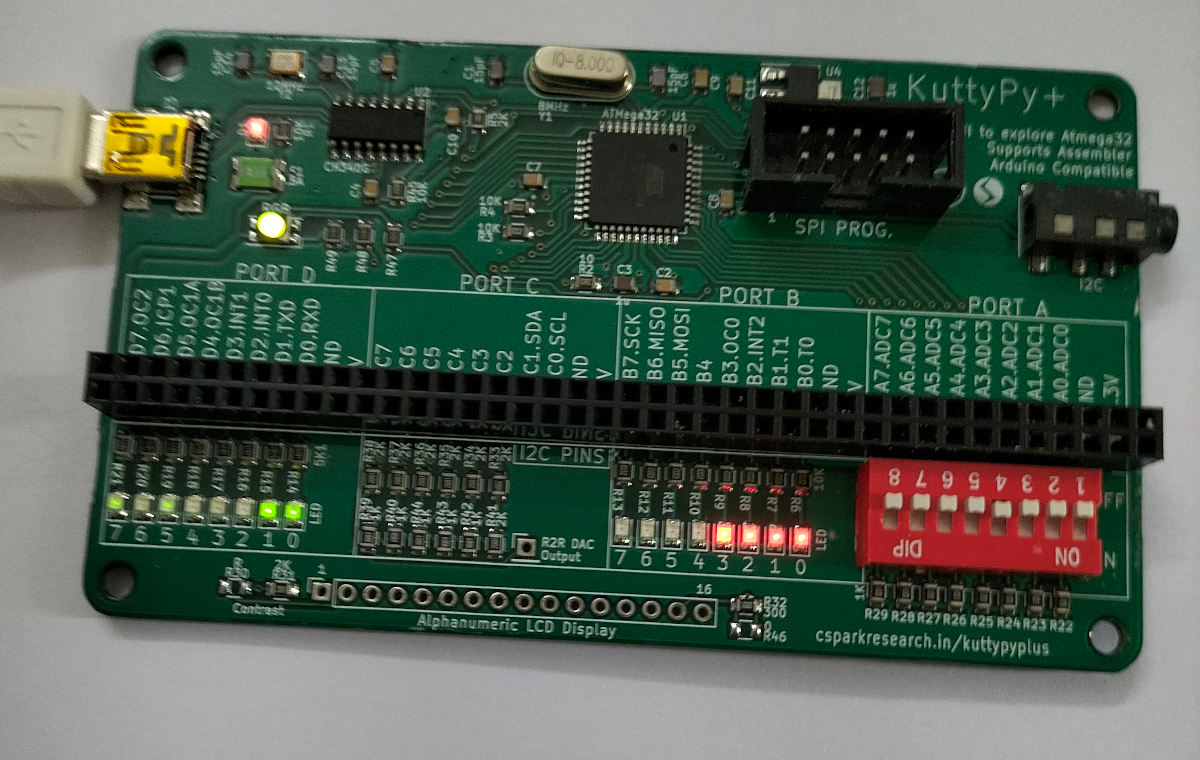
The AtMega32 micro-controller (used in KuttyPy) has four generel purpose I/O ports, named A,B,C and D. On the circult board we have LEDs connected to Port B and port D. Switches are connected to Port A so that the voltage applied on each pin (there 8 pins on a port)can be made 0 ot 5 volts. The data direction of each pin on a port is controlled by DDRx (x could be A,B,C or D) registers.
Let us connect the KuttyPy board to the USB port (you need an OTG adapter for this). Once it is connected, we can use the command blocks from the KuttyPy section to control the Atmega32 micro-controller on it. The Code Blocks allow you to change the voltage levels of output pins and also monitor the voltages applied to input pins. You need to connect KuttyPy board to the USB port of the phone sing an OTG adapter. In some phones you need to enable the OTG from the phone settings.
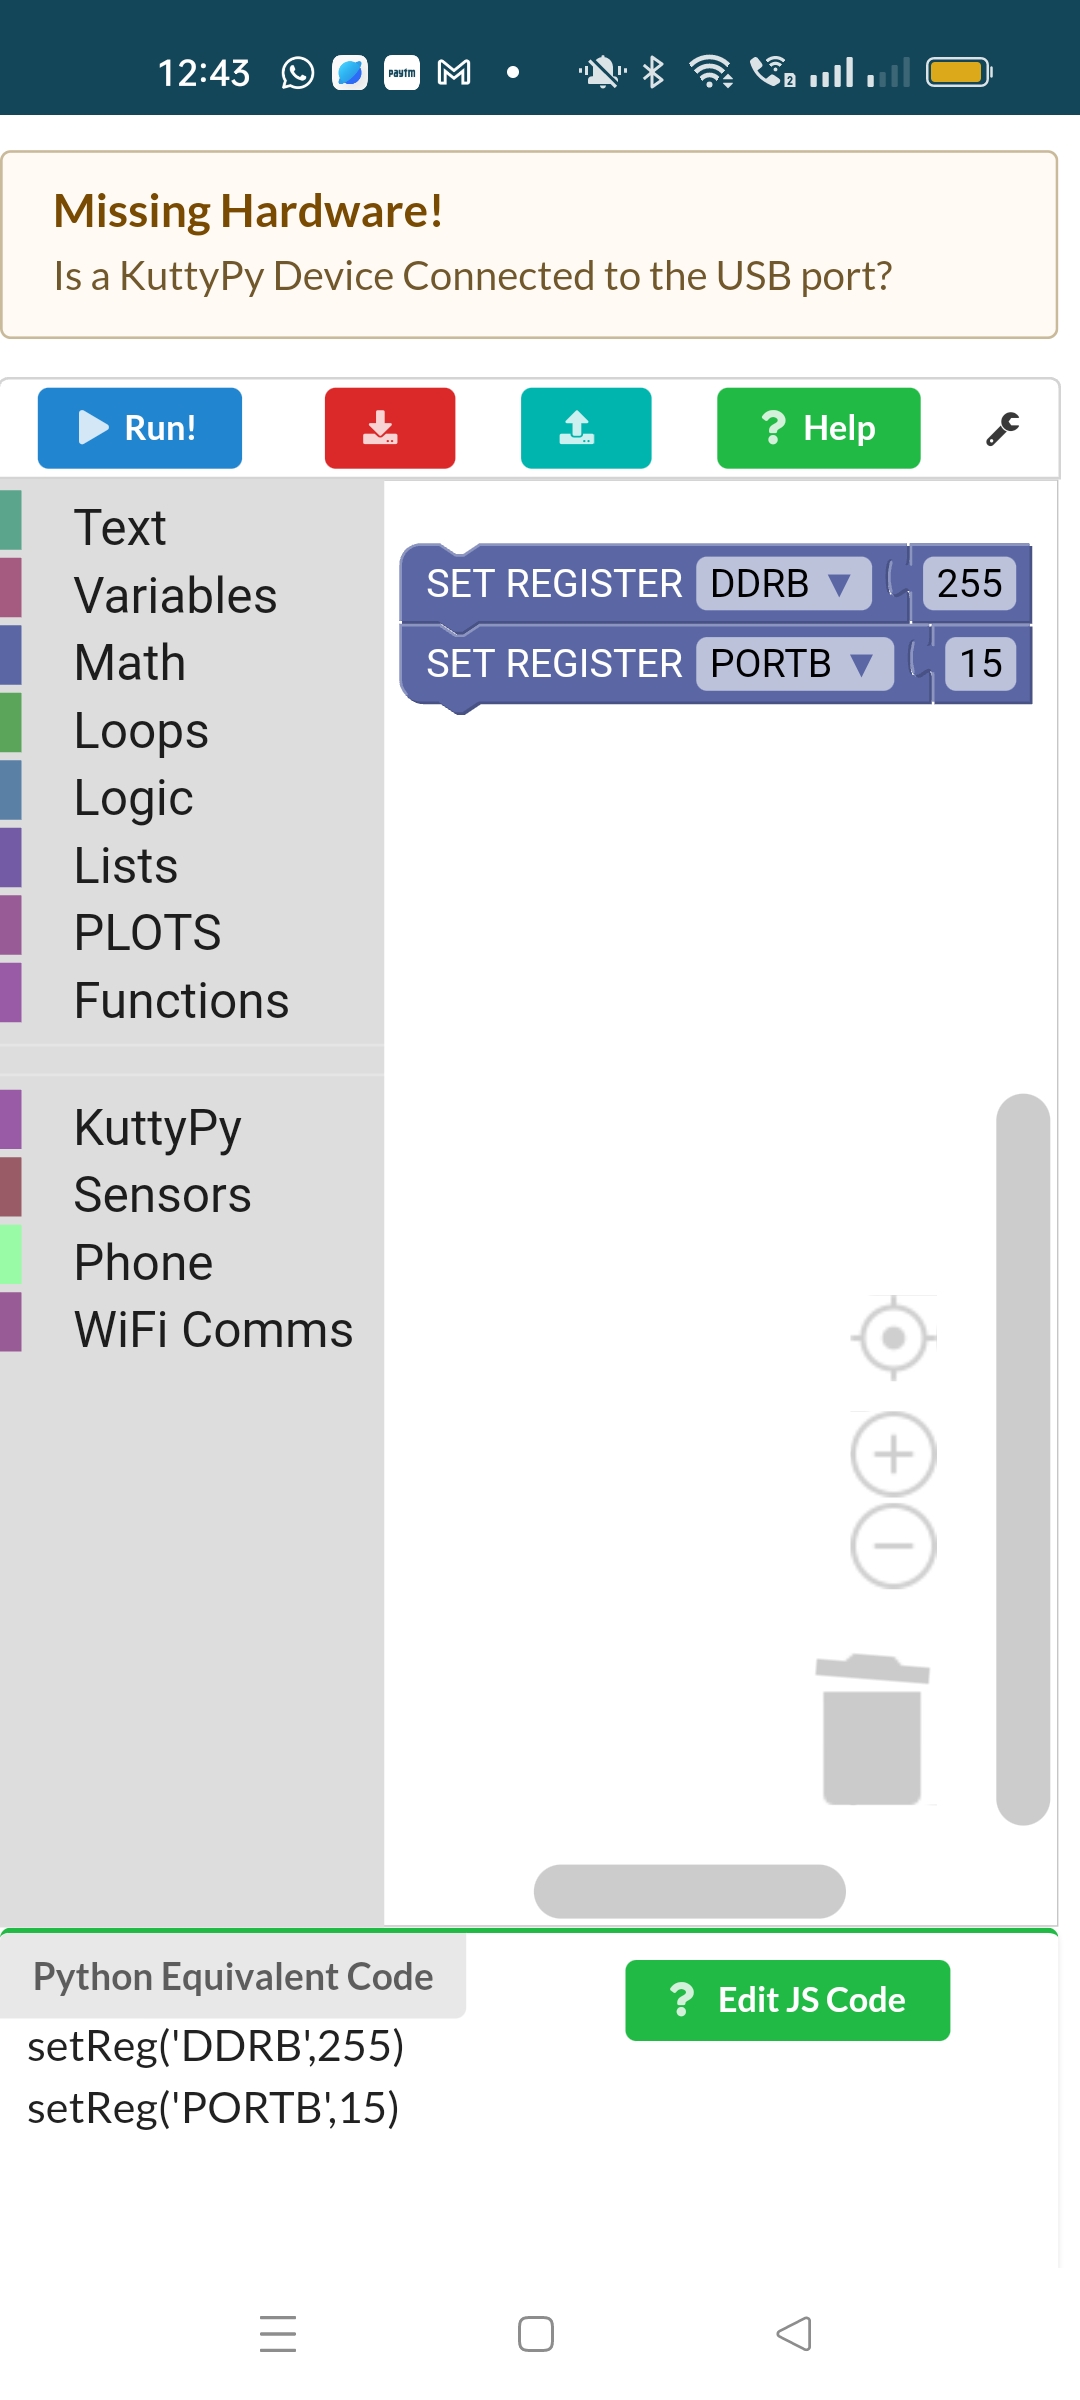
Code to set four pins of Port B
Result of the Code, 4 LEDs lighted
Here we are changing the micro-cotroller registers by communicating to a program permanently running on it. After gaining some familiarity with the micro-controller, one can proceed with coding in C language, compile it and upload it to the micro-controller.
When you apply power to a micro-controller, the program stored inside the ROM starts running. But howto deposite code into the memory ? Moderm UCs support mainly two methods.
SPI Interface. Using three pins of the UC, we can access the UC memory.
Boot Loader. We first deposit this code to the UC memory to a particular location. Whenever the UC is powered, it starts running the Boot Loader code. This code looks for some communication on the Serial Port (a transmit/receive pair or pins) and if it finds any external device sending code the new code will be put in the ROM and executed. This technique allows uploading code from a computer to a UC in a single click. The serial port of the UC is conected to the USB port of the PC requires a USB to Serial converter. Boards like Arduino have such a converter built-in.
We will be using a board having an Atmega32 micro-controller on it. It is chosen because of the four 8 bit Input/output ports (A,B,C and D) in an ordered manner. Our board is called KuttyPy, that contains;
The boot loader code of KuttyPy has some extra capabilities. It can accept commands via the USB port and communicate to an external PC. Using this we can read/write all the Registers of the micro-controller.